High latency in NuCorder: causes, settings and solutions

A remote rehearsal always involves some delay: the sound must be captured by the audio interface, processed by the computer, sent to the NuCorder server and then transmitted to the other musicians.
NuCorder aims to keep this delay as low as possible, but the result depends on each participant’s setup, internet connection, distance from the server and selected settings.
Before changing any settings, try to identify what you are experiencing:
the sound is stable but arrives too late: distance, internet routing or buffers set too high may be responsible;
the sound cuts out or crackles: the connection may be unstable, the audio quality may be too high or some buffers may be too low;
the problem affects only one musician: start by checking their computer, connection, driver and audio interface;
the problem affects the whole band: check the distance from the server and each participant’s network conditions.
Change only one setting at a time, then play for a few moments before assessing the result.
Check the distance and your internet connection
During a session, each participant connects to a NuCorder server. The longer the route between a musician and the server, the longer the sound takes to travel.
The current recommended coverage area includes mainland France, Belgium, Luxembourg and Andorra. NuCorder remains accessible from other countries on a best-effort basis, but greater distances or unfavourable network routes may make the delay more noticeable.
View NuCorder’s recommended coverage area
The speed advertised by your internet service provider is not enough to predict the result. A stable ADSL connection may sometimes perform better than a faster but less consistent connection. Stability and response time are essential for making music in real time.
For the most predictable conditions:
connect each computer to its router using an Ethernet cable;
avoid Wi-Fi whenever possible;
pause downloads, cloud backups and video streaming services;
temporarily disable any VPNs;
avoid heavy use of the connection by other devices during the session.
A 4G or 5G connection may work, but its response time can vary depending on coverage, network load and radio conditions. It is therefore less predictable than a stable wired connection.
Check that NuCorderDesktop detects your audio interface
NuCorderDesktop automatically selects a configuration that is compatible with the detected audio interface. You do not need to set the sample rate manually.
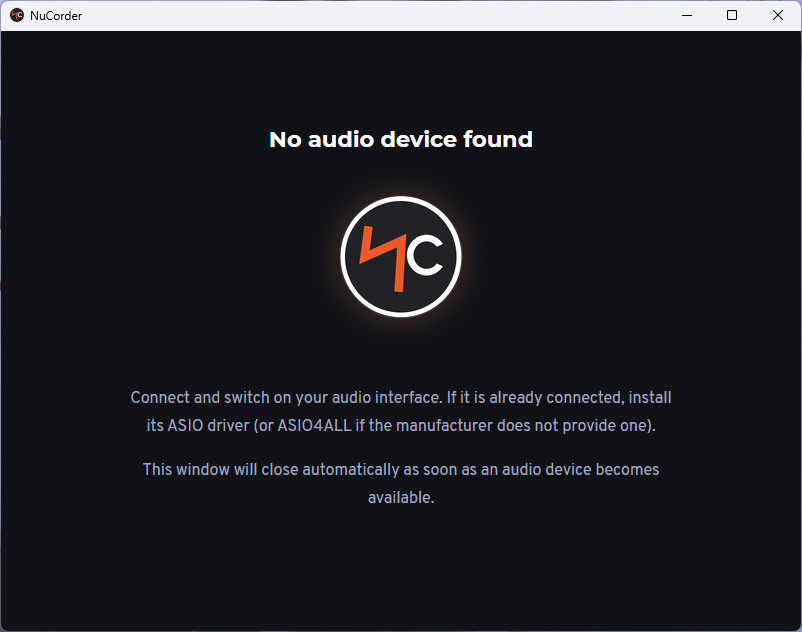
If no compatible interface is available, NuCorderDesktop displays the message “No audio device detected”. The window closes automatically as soon as a usable device becomes available.
In this case:
check that the audio interface is connected and switched on;
make sure its driver is installed;
close any other applications that may be using the interface;
wait a few moments for NuCorderDesktop to detect it.
On Windows, use the ASIO driver provided by the interface manufacturer whenever possible. If no ASIO driver is available, ASIO4ALL can be used as an alternative.
On Linux, NuCorder remains available on a best-effort basis. Detection and performance may vary depending on the distribution, hardware and audio configuration.
Access the settings from the mixing console
The audio and latency settings are now available from the session’s mixing console.
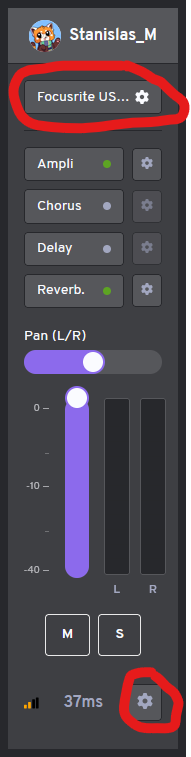
Open the console and locate your own channel strip. Two buttons provide access to the settings:
the gear icon to the right of your audio interface’s name opens the sound card settings;
the gear icon at the bottom, next to the latency value in milliseconds, opens the Latency and performance window.
Check the sound card settings
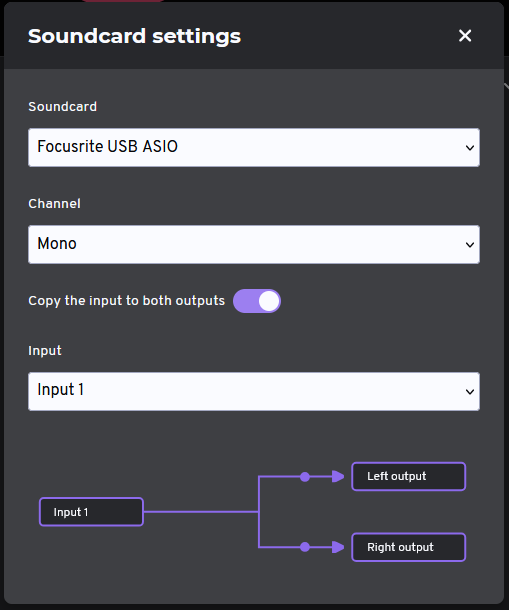
Click the gear icon to the right of your audio interface’s name.
The Sound card settings window lets you choose:
the audio device to use;
mono or stereo operation;
the input or inputs to use;
how these inputs are routed to the left and right outputs.
Make sure the selected interface and input match the equipment to which your instrument or microphone is connected.
Selecting the wrong input or channel does not necessarily increase latency, but it may result in no signal, an incomplete signal or sound being sent to the wrong side.
Adjust the audio buffer size
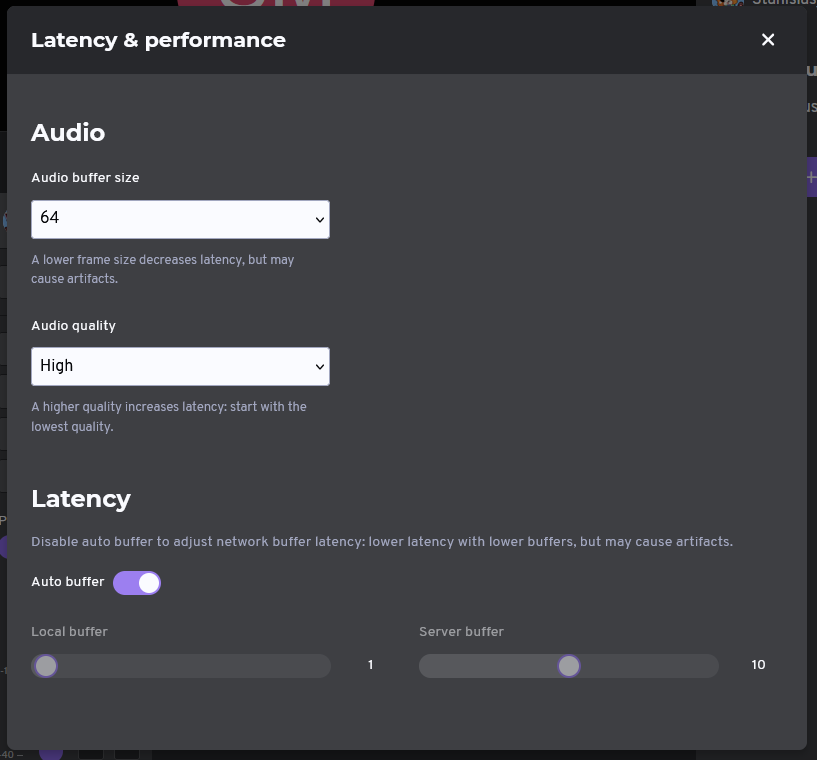
In the mixing console, click the gear icon next to your latency value. The Latency and performance window lets you change the audio buffer size.
The audio interface samples the sound in small blocks before sending it to the computer. The size of these blocks directly affects local latency:
a smaller buffer reduces the delay but places more demand on the computer and may produce audio artefacts;
a larger buffer generally improves stability but adds more delay.
If the sound is stable but arrives too late, try reducing the buffer size gradually. If you hear crackling or dropouts, increase it until the sound becomes stable again.
Do not automatically select the lowest value: the best setting is the smallest buffer that your computer and audio interface can use without degrading the sound.
Adjust the audio quality
The same window lets you select the audio quality used during the session.
Higher quality requires more processing and may increase latency. When testing your setup for the first time, or when the sound is unstable, start with the lowest quality setting.
Once the session is working correctly, you can gradually increase the quality and check after each change that the sound remains stable.
Check the network buffers
Jitter refers to variations in the time taken by audio packets to travel across the network. Network buffers briefly hold incoming packets to compensate for these variations.
A larger buffer can reduce dropouts but also increases latency. Conversely, a smaller buffer reduces the delay but is less tolerant of an unstable connection.
These settings are located in the Latency section of the Latency and performance window.
Start with Automatic buffer enabled. NuCorder will then adjust the buffers to the observed conditions.
If the result is not satisfactory:
disable Automatic buffer;
make a small adjustment to either the local or server buffer;
play for a few moments;
check the delay, dropouts and audio artefacts;
return to the previous setting if the result becomes worse.
Lower values reduce latency but may produce audio artefacts when the connection is not sufficiently stable.
Avoid changing the audio buffer, audio quality and both network buffers at the same time. Otherwise, you will not be able to determine which setting improved or degraded the result.
Identify the source of the problem
In a band, a single computer or internet connection can degrade the experience for the other participants.
To isolate the problem:
start with two musicians;
check that the audio works correctly in both directions;
add the other participants one at a time;
note when the delay or dropouts begin to appear.
This method can help determine whether the problem comes from a particular setup, the number of participants or the overall conditions of the session.
Is the problem still occurring?
Prepare the following information before contacting support:
each participant’s operating system;
the model of each audio interface;
the driver used on Windows;
the selected audio buffer size and quality level;
whether Automatic buffer is enabled;
each musician’s connection type: Ethernet, Wi-Fi or mobile network;
each participant’s city or country;
an accurate description of the problem: consistent delay, dropouts, crackling or changing latency.
This information will help us distinguish between a local, audio or network issue.
Any other question?
Send us a request